1、什么是MQTT
MQTT(Message Queuing Telemetry Transport,消息队列遥测传输协议),是一种基于发布/订阅(publish/subscribe)模式的"轻量级"通讯协议,该协议构建于TCP/IP协议上,由IBM在1999年发布。MQTT最大优点在于,可以以极少的代码和有限的带宽,为连接远程设备提供实时可靠的消息服务。作为一种低开销、低带宽占用的即时通讯协议,使其在物联网、小型设备、移动应用等方面有较广泛的应用。
MQTT是一个基于客户端-服务器的消息发布/订阅传输协议。MQTT协议是轻量、简单、开放和易于实现的,这些特点使它适用范围非常广泛。在很多情况下,包括受限的环境中,如:机器与机器(M2M)通信和物联网(IoT)。其在,通过卫星链路通信传感器、偶尔拨号的医疗设备、智能家居、及一些小型化设备中已广泛使用。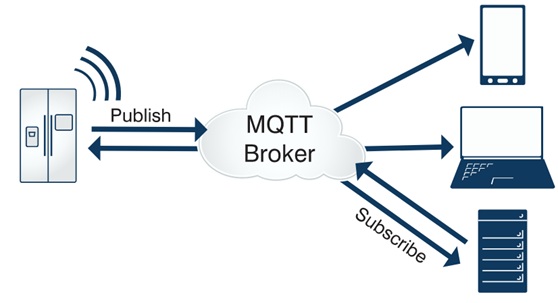
2、MQTT部署
从 https://mosquitto.org/ 官网根据您的系统下载相应的版本
编译前需要一些组件提前安装:
yum  -y install openssl-devel
yum  -y install gcc-c++
yum  -y install cmake
然后进入mosquitto目录,执行make &&make install,如果过程中报错,可以修改 mosquitto 目录下的 config.mk。
编辑config.mk,可以把with_cjson改为no
安装完后配置,命令的目录为
/usr/local/bin
配置文件目录为
/etc/mosquitto/
可以把 mosquitto. example(主要配置文件)pwfile. example(密码保存文件)重新命名为.conf文件。
3、MQTT命令
3.1、匿名访问:
订阅:
mosquitto_sub -t temp
发布:
mosquitto_pub -t temp -m hello
3.2单项认证方式:
修改配置文件,增加:
listener 8883
certfile /usr/local/bin/server.crt
keyfile /usr/local/bin/server.key
cafile /usr/local/bin/ca.crt
allow_anonymous false
password_file /etc/mosquitto/pwfile.conf
秘钥生成工具
#!/bin/bash
[ -n "$DEST" ] || DEST="."
mkdir -p "$DEST"
pushd "$DEST" || exit

openssl genrsa -out ca.key 2048
openssl req -new -x509 -days 365 -key ca.key -subj "/C=CN/ST=GD/L=SZ/O=Acme, Inc./CN=Acme Root CA" -out ca.crt

openssl req -newkey rsa:2048 -nodes -keyout server.key -subj "/C=CN/ST=GD/L=SZ/O=Acme, Inc./CN=192.168.37.129" -out server.csr
openssl x509 -sha256 -req -extfile <(printf "subjectAltName=DNS:192.168.37.129") -days 365 -in server.csr -CA ca.crt -CAkey ca.key -CAcreateserial -out server.crt

openssl req -newkey rsa:2048 -nodes -keyout client.key -subj "/C=CN/ST=GD/L=SZ/O=Acme, Inc./CN=client" -out client.csr
openssl x509 -req -days 365 -in client.csr -CA ca.crt -CAkey ca.key -CAcreateserial -out client.crt
openssl pkcs12 -export -clcerts -in client.crt -inkey client.key -out client.p12
openssl pkcs12 -in client.p12 -out client.pem -clcerts
popd || exit
主要上面的ip地址改为实际的服务器的ip地址,我们是在/usr/local/bin目录下生成的,所以下面的命令都是用的这个目录。
用配置文件的方式启动mqtt
mosquitto -c /etc/mosquitto/mosquitto.conf -v
订阅:
mosquitto_sub -t "temp" -u zs -P 111111 --cafile /usr/local/bin/ca.crt -p 8883 -h 192.168.37.129
发布:
mosquitto_pub -t temp -m hello-world -u zs -P 111111 --cafile /usr/local/bin/ca.crt -p 8883 -h 192.168.37.129
3.3 双向认证:
配置文件中再增加下面2句话
require_certificate true
use_identity_as_username true
订阅:
mosquitto_sub -t "temp" -u zs -P 111111 --cafile /usr/local/bin/ca.crt -p 8883 -h 192.168.37.129 --cert /usr/local/bin/client.crt --key /usr/local/bin/client.key
发布:
mosquitto_pub -t temp -m hello-world -u zs -P 111111 --cafile /usr/local/bin/ca.crt -p 8883 -h 192.168.37.129 --cert /usr/local/bin/client.crt --key /usr/local/bin/client.key
4、客户端测试

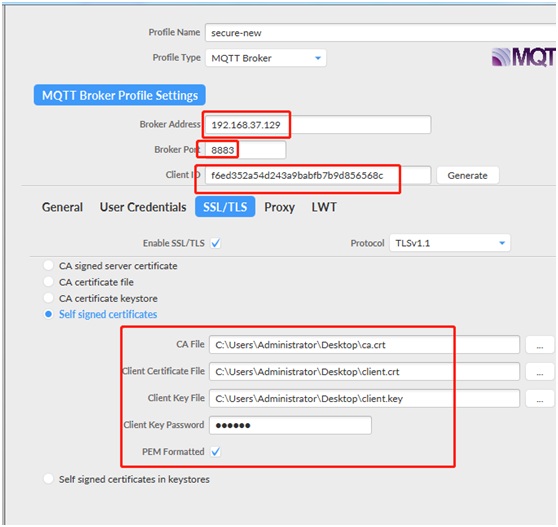
- profile name 自定义
- profile type 选mqtt broker
- 地址选mqtt服务的地址
- 端口为自己配置的8883
- id可以点击后面的generate自动生成
- ssl/tls如果启用了双向认证就需要填写
- 选择第四项,把之前服务器上生成的ca.crt client.crt client.key还有生成时的密码输入上

在usr credentials里输入自己在服务器上添加的用户和密码。

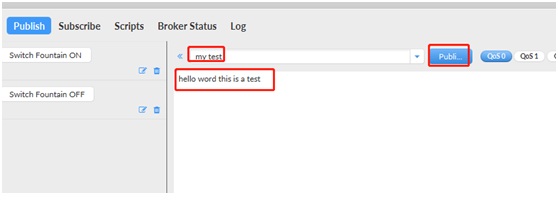
点击connect,右上角圆圈变为绿色说明连接成功,在subscribe里输入自己订阅的主题

在publish里输入订阅的主题及内容,然后点击publisb
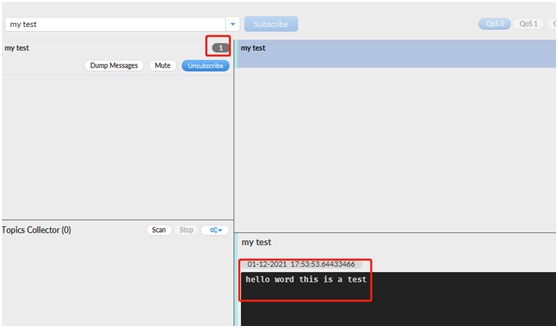
在订阅里就可以查询到发布的内容


还得优化下排版额。